Sometimes just listing events in your calendar can be a little bland. Why not add a little flair by giving your visitors a more noticeable structure with bullets, more color with images, or links to other relevant pages? This tutorial lists and explains all of the elements that HTML Calendar Maker Pro can make for you.
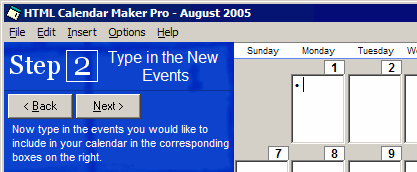
I want to add to my calendar: |
| –Bullets Visually separate events –Images Add pictures to particular dates –Links Show links to web pages for a specific date –Popup Links Make a web page open in a separate window |
All of the above can be inserted using theInsert menu at the top of the main calendar window. When chosen, the item will will create the appropriate web page code necessary to display the element correctly when your web page is viewed with a web browser. This code will be placed Within the text box you are currently working on (where the cursor is located). If you know HTML, keep in mind that you can then modify these elements as you see fit or you can add your own code directly into the text box. (Please note, however, that line feeds are always converted to<br> tags.)
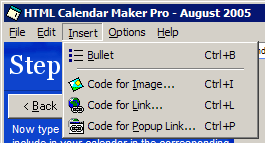
Inserting Bullets
Bullets are useful for listing events or other items that reside on the same day.
Example:
| Event 1 – 10:00am Event 2 – 11:30am Event 3 – 3:00pm |
HTML Calendar Maker Pro inserts a bullet character that is converted to web page code (#149 in HTML) when the web page is written. Typically, this is used before each event but you may use this and any other element anywhere in the text box that you wish.
An Inserted Bullet
Inserting Images
Images are not actually displayed in the text boxes. Instead, the web page code for images is inserted.html Calendar Maker Pro makes this code-inserting process easy by prompting for the name of the file and then creating all of the necessary code for you. Keep in mind that when you upload your web page calendar to your server, be sure to place each image in the specific location that you typed in the prompt. Also note that many servers require the same upper- or lowercase letters in both the name you typed in your calendar as well as the actual image itself. Otherwise, the image may not appear in your calendar.
Inserting Links
Links are inserted in a manner similar to images; the web page code is inserted into the active text box. The first step asks you to type in the name of the link. This can be as simple as the words “Click here.” Next, type in the address of the link, like “https://www.htmlcalendar.com” for another site or like “index.htm” for an page located on your site. If the link is to another site, be sure to include the “http://” or “https://” in the front.
Inserting Popup Links
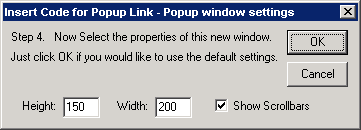
Popup Links are just like normal links except that they open the page they point to in a separate window when the user clicks on the link. Two of the steps for inserting links are the same, plus a middle step and fourth step. First you are prompted for the name of the link, then you will be asked for the name of title of the popup window. The text you enter will appear in the title bar of the popup window. Please note that, in order for the popup window to work correctly in your web page, no punctuation is allowed. Spaces are not permitted either, but if used they will be replaced with underscores ( _ ). The third step prompts you for the web address of the page that will open in a separate when the link is clicked. The web page will not automatically be created by this program, so you must use either a preexisting page or create one yourself using a web page editing program. The fourth step, shown in Figure 3 below, asks for the dimensions of the popup window that will appear. The preset height of 150 and width of 200 pixels will create a small window that is best suited for displaying a short web page. The dimensions are in units of pixels, or dots on the screen. If you would like to show or hide scrollbars, which can make viewing a page that doesn’t fit within the confines of the popup window much easier, a checkbox is available. It is recommended that unless you are sure the page you are linking to will fit fully inside the window, the scrollbars should remain visible. Figure 4 demonstrates an example of a popup link using the default dimensions as well as with a visible scrollbar.
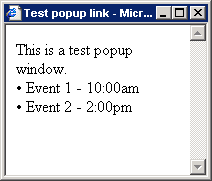
A Test Popup Link